Why Lighting Can Make or Break a Listing Photo
Lighting is one of the most important factors in real estate photography. It affects how large a room feels, how clean the finishes look, how buyers read the layout, and how professional the listing appears online.
A property can be well staged, well priced, and well located, but poor lighting can still make the listing feel weaker than it is. Dark rooms can feel smaller. Harsh shadows can distract from the space. Overexposed windows can hide views. Mixed colour temperatures can make interiors feel inconsistent or dated.
For Vancouver realtors and brokerages, lighting matters because buyers often compare listings on mobile before deciding which homes deserve a showing. The photo gallery has to communicate quickly. It should show the property clearly, accurately, and with enough visual quality to support buyer confidence.
Professional real estate photography does not guarantee more showings or a faster sale. Pricing, location, condition, timing, and market demand still matter. But strong lighting can improve the listing’s presentation, reduce visual friction, and help buyers understand the property more clearly.
Key Takeaways for Better Real Estate Photo Lighting
Good lighting in real estate photography is not about making every room look artificially bright. It is about creating clarity.
A strong lighting approach should:
- Make rooms feel clean and readable
- Show finishes, materials, and layout accurately
- Preserve important window views where possible
- Reduce harsh shadows and blown-out highlights
- Keep colour temperature consistent
- Support the mood of the property
- Avoid making spaces feel misleading
- Match the editing style across the full gallery
- Help buyers focus on the property’s strongest features
For Vancouver listings, lighting also needs to account for weather, seasonal daylight, views, north-facing units, tree coverage, dense urban surroundings, and smaller interior spaces. A bright summer condo and a shaded winter townhome may require very different photography decisions.
How Lighting Shapes Buyer Perception
Buyers may not consciously analyze lighting, but they react to it.
A bright, balanced photo can make a room feel open, clean, and easier to evaluate. A dark or uneven photo can create hesitation. Buyers may wonder whether the home lacks natural light, whether the finishes are outdated, or whether the property has been photographed quickly.
Lighting affects perception in several ways.
First, it changes the sense of space. Rooms with balanced light often feel more open because buyers can see corners, surfaces, windows, and transitions clearly.
Second, it changes perceived condition. Good lighting helps show flooring, cabinetry, countertops, walls, fixtures, and finishes without unnecessary shadows or colour problems.
Third, it affects trust. If photos look too dark, too edited, or inconsistent from room to room, buyers may question the listing presentation.
Fourth, it sets tone. Soft light can make a home feel calm. Bright natural light can make it feel airy. Controlled contrast can make luxury interiors feel more refined. Warm light can make certain spaces feel comfortable, but too much yellow light can make the home feel dated.
The goal is not to manipulate buyers. The goal is to make the property easier to understand online.
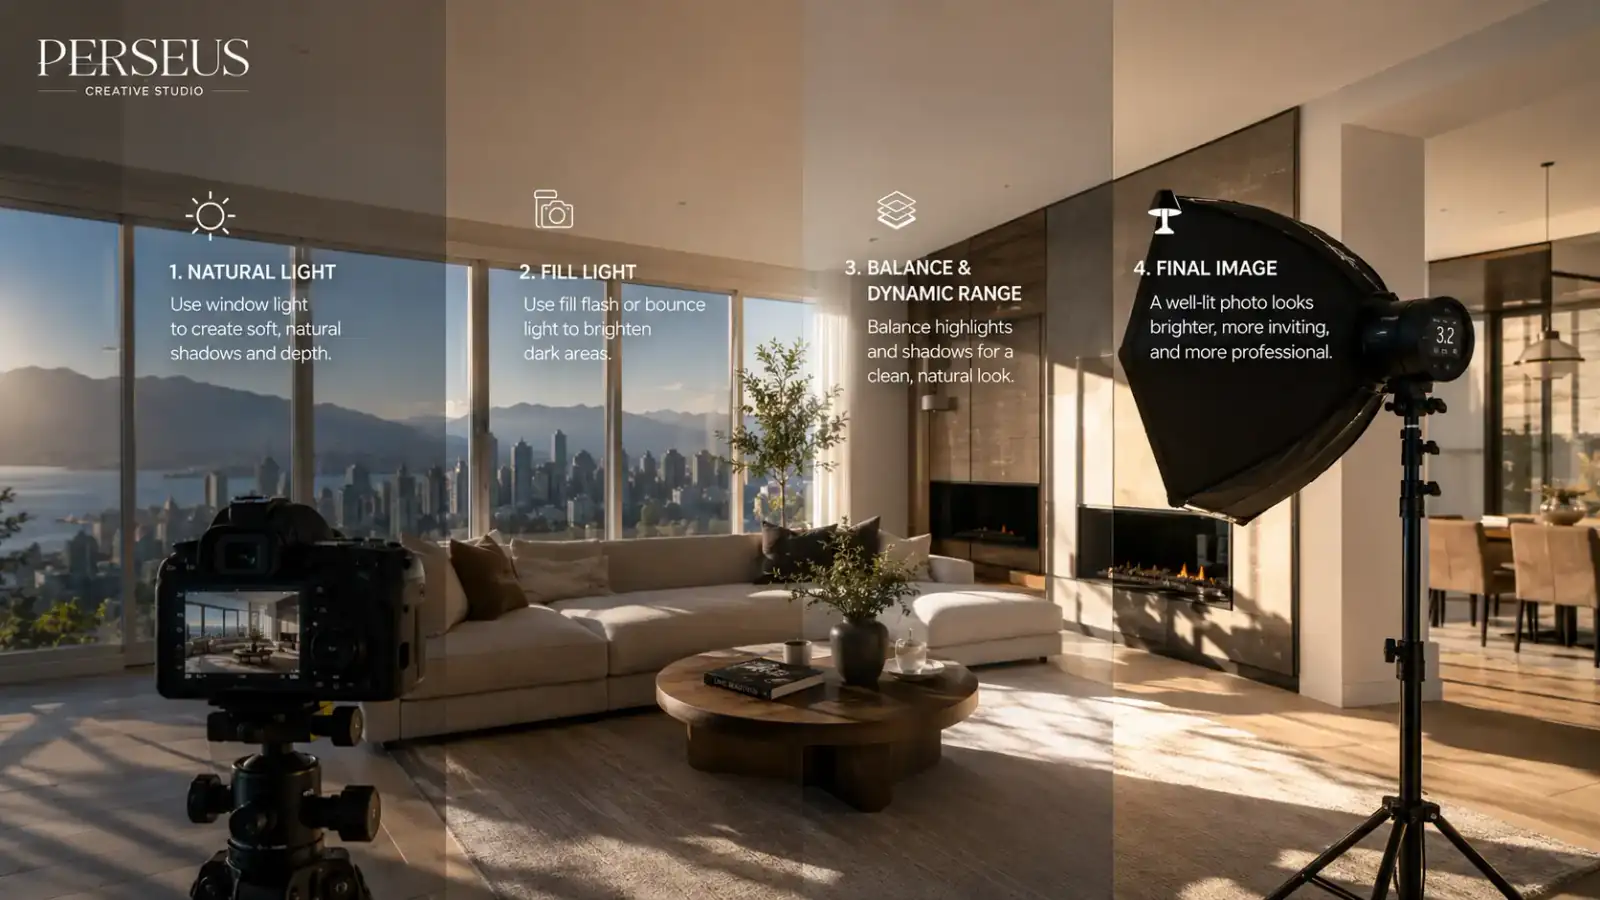
Natural Light Is the Foundation
Natural light is often the best starting point for real estate photography because it helps rooms feel believable and connected to the outside environment.
Window light can show brightness, exposure, view direction, and the way the home feels during the day. For many Vancouver properties, natural light is part of the selling story. A condo with city views, a North Shore home with mountain outlooks, or a family home with large windows should use natural light strategically.
However, natural light is not automatically perfect. It changes by time of day, weather, season, window direction, and surrounding buildings.
A south-facing room may be bright but harsh at certain times. A north-facing room may be soft but darker. A tree-lined property may have filtered light. A downtown unit may have reflected light from nearby towers. A view property may require careful exposure so the view does not disappear.
Good real estate photography uses natural light intentionally rather than passively.
When to Schedule Around Light
Timing can change the quality of a listing shoot.
Some homes photograph better in the morning. Others are stronger in the afternoon. View properties may need a specific time of day to show the view clearly. Exterior photos may need softer light to avoid harsh shadows. Condos with limited direct sunlight may need careful scheduling to avoid looking flat or dim.
Before scheduling a shoot, the realtor should consider:
- Which direction the main windows face
- Whether the property has a view
- Whether the listing depends on outdoor space
- Whether direct sunlight creates harsh contrast
- Whether neighbouring buildings block light
- Whether the season affects daylight quality
- Whether twilight photos are useful for the property
Vancouver weather adds another layer. Overcast conditions can create soft, even light, which can be useful for interiors and exteriors. Heavy rain or very dark conditions can weaken the final gallery. Strong sun can create dramatic views but may also create high contrast.
The right timing depends on the property’s strongest features.
Managing Window Light and Views
Windows are one of the most important lighting challenges in real estate photography.
A room may look bright in person, but the camera has to manage a wide difference between the interior and the outside view. If the image is exposed for the room, the window may become too bright. If the image is exposed for the view, the room may become too dark.
This is especially relevant in Vancouver because views can be a major selling feature. Mountain, ocean, city, park, and skyline views need to be captured carefully.
A professional approach may involve:
- Choosing the right time of day
- Adjusting blinds or curtains
- Using exposure bracketing
- Blending exposures carefully
- Adding controlled flash where needed
- Editing highlights and shadows with restraint
- Composing the room so the view supports the image
The goal is to show the room and the view in a believable way. Overly processed window views can look artificial. Completely blown-out windows can waste one of the property’s strongest assets.
Artificial Light Has to Be Controlled
Artificial light can help when natural light is not enough. It can brighten dark rooms, reduce shadows, and improve detail visibility. But it has to be used carefully.
Poor artificial lighting can create harsh shadows, reflections, hot spots, yellow colour casts, or an unnatural look. This is why simply turning on every light in the home is not always the best solution.
Interior lights vary in colour temperature. Some bulbs are warm yellow. Others are cooler blue or white. When different light sources mix in one room, the camera may capture inconsistent colour across walls, floors, cabinets, and ceilings.
Professional real estate photography may use artificial light in several ways:
- Existing room lights for atmosphere
- Off-camera flash for controlled brightness
- Bounced flash for softer illumination
- LED panels for selective fill
- Exposure blending for difficult rooms
- Editing to correct colour balance
Artificial light should support the room, not overpower it. The best result usually feels natural even when professional lighting was used.
Mixed Lighting Is a Common Problem
Mixed lighting happens when a room has multiple light sources with different colour temperatures. For example, daylight from a window may appear cool, while ceiling lights or lamps may appear warm.
This can make the photo feel uneven. One side of the room may look blue, while another looks yellow. White walls may shift colour. Cabinets may look different from one image to the next.
Mixed lighting is common in real estate photography because homes are not designed like studios. A property may have daylight, pot lights, pendant lights, lamps, under-cabinet lighting, and reflective surfaces all working at once.
To reduce mixed lighting issues, the photographer may:
- Turn off certain lights
- Use consistent bulbs where possible
- Balance artificial light with flash
- Adjust white balance carefully
- Use editing to correct colour differences
- Avoid angles where mixed light becomes distracting
For sellers and agents, preparation helps. Replacing mismatched bulbs before the shoot can improve consistency. Removing heavy window coverings can also help natural light dominate the room.
Dark Rooms Need Strategy, Not Overediting
Some rooms are naturally dark. Bathrooms, dens, basements, hallways, interior bedrooms, and north-facing rooms can be difficult to photograph well.
The solution is not simply to brighten everything in editing. Overediting dark rooms can create noise, flat contrast, strange colours, and unrealistic images. A better approach starts during the shoot.
Dark rooms may need:
- A tripod
- Longer exposure
- Controlled flash
- Bounced light
- LED fill
- Cleaner surfaces
- Lighter staging elements
- Careful angle selection
- A composition that shows function clearly
For small or dark Vancouver condos, this matters. Buyers need to understand whether the space is useful. If a den is photographed poorly, it may look like a storage area instead of a functional work-from-home space.
Good lighting turns a difficult room into a clear room. It does not need to make every space look equally bright.
Avoiding Harsh Shadows and Hot Spots
Harsh shadows can make a room feel less polished. Hot spots can pull attention away from the property.
A hot spot is an area that appears too bright compared with the rest of the image. It may come from a lamp, window reflection, glossy countertop, mirror, floor, or direct flash. In real estate photography, these bright distractions can make the image feel less controlled.
Shadows can also cause problems. A shadow from furniture, window frames, a light fixture, or the photographer’s equipment can distract from the room.
To control shadows and hot spots, professional photography may use:
- Softer light sources
- Bounced flash
- Adjusted camera angles
- Better timing
- Exposure blending
- Polarizing techniques in certain situations
- Editing to reduce highlights carefully
The goal is not to remove all contrast. Some contrast gives depth. The goal is to avoid lighting problems that distract from the property.
HDR and Exposure Blending
HDR, or high dynamic range photography, can be useful in real estate because interiors often contain both dark areas and bright windows.
The basic idea is to capture multiple exposures and combine them so the final image shows more detail in shadows and highlights. This can help show a room and its window view more clearly.
However, HDR has to be used carefully. Overdone HDR can make photos look artificial, flat, overly sharp, or unrealistic. Buyers may notice when the image feels processed.
A professional approach uses exposure blending to support natural-looking clarity. The final image should still feel like a real room.
HDR and exposure blending can be useful for:
- Bright windows
- View properties
- Dark interiors
- High-contrast living rooms
- Kitchens with reflective surfaces
- Bathrooms with mirrors and glass
- Exteriors with shadowed entries
For Vancouver real estate listings, this technique can be especially useful when views and natural light are part of the property’s appeal.
Lighting for Kitchens, Bathrooms, and Feature Rooms
Different rooms need different lighting decisions.
Kitchens often need balanced light to show counters, cabinetry, appliances, flooring, and connected living spaces. Reflective surfaces can make lighting difficult, so angle selection matters.
Bathrooms need clean lighting because they are smaller and often include mirrors, glass, tile, and bright fixtures. Clutter and reflections become more obvious under strong light.
Living rooms usually need light that shows openness, windows, seating, and flow. If there is a view, the window exposure needs careful handling.
Bedrooms should feel calm and comfortable. Overly harsh light can make them feel less inviting.
Feature rooms need special attention. A home office, wine room, theatre room, gym, studio, or flex space should be lit in a way that makes its purpose obvious.
The best lighting plan is not one-size-fits-all. It changes by room.
Exterior Lighting and Curb Appeal
Lighting affects exterior photos as much as interiors.
The front exterior is often a key listing image. It may be the buyer’s first impression of the property. If the exterior is photographed under harsh sun, deep shade, heavy rain, or poor timing, curb appeal can suffer.
Exterior photography should consider:
- Direction of sunlight
- Shadow patterns
- Landscaping
- Driveway and entry visibility
- Window reflections
- Sky conditions
- Whether the front or rear exterior is stronger
- Whether twilight photos are appropriate
Twilight photography can be useful for certain listings, especially luxury homes, properties with strong exterior lighting, homes with pools or patios, and listings where atmosphere matters. But it should be used selectively.
Not every home needs twilight imagery. It works best when the lighting design, exterior architecture, or outdoor features justify it.
Preparing the Home for Better Light
Realtors and sellers can improve lighting before the photographer arrives.
Simple preparation can make a major difference:
- Clean windows and mirrors
- Open blinds and curtains where appropriate
- Replace burned-out bulbs
- Use consistent bulb colours where possible
- Remove clutter from windowsills
- Turn off distracting lamps if needed
- Clear reflective surfaces
- Prepare balconies, patios, and view areas
- Make sure exterior lights work
- Confirm access to dark rooms, storage areas, and secondary spaces
Preparation is especially important for videography, but it also matters for photography. The cleaner and more controlled the space is, the easier it is to create bright, readable images.
A photographer can control many things. They cannot fully compensate for a property that is not ready.
Watch How Lighting Supports Visual Storytelling
Lighting is easier to understand when you can see how it changes mood, pacing, and attention. In real estate media, light does more than brighten the frame. It helps shape how the viewer moves through the property visually.
For listing photography, the same principle applies. The strongest images use light to clarify the space and guide the buyer toward the features that matter most.
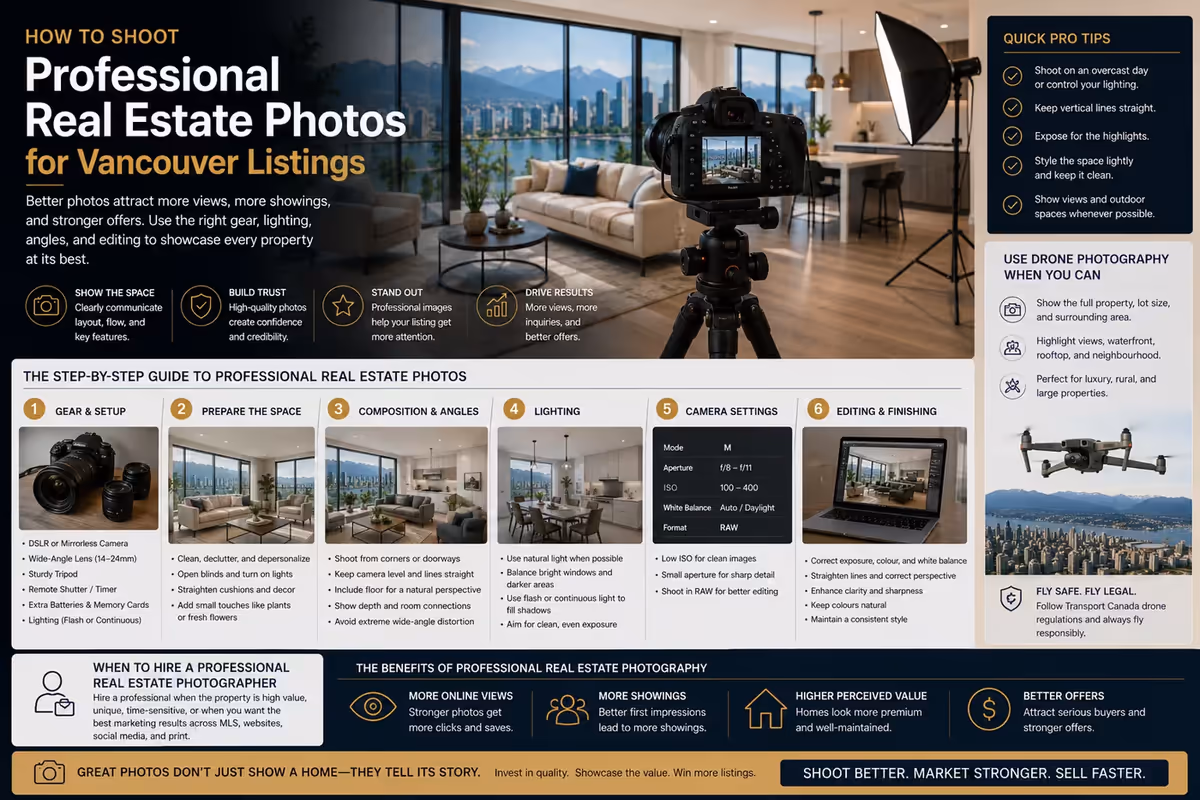
Recommended Tools and Techniques for Better Lighting
The right tools depend on the property and the photographer’s workflow. For agents, the exact equipment matters less than the final result. Still, it helps to understand what professional real estate photographers may use.
Common tools and techniques include:
- A tripod for stability and slower shutter speeds
- Off-camera flash for controlled interior light
- Bounced flash for softer, more natural illumination
- LED panels for selective fill
- Exposure bracketing for high-contrast scenes
- HDR or exposure blending for windows and dark interiors
- Editing software for colour, exposure, and perspective control
- Camera levels and grids for cleaner composition
- Consistent workflow for matching images across the gallery
Good lighting is usually not created by one tool. It is created by combining preparation, timing, equipment, and editing.
A bright image is not automatically a good image. The best lighting feels intentional, natural, and useful.
Common Lighting Mistakes Realtors Should Notice
Realtors do not need to be photographers, but they should be able to recognize lighting problems before a listing goes live.
Common issues include:
- Rooms that look darker than they feel in person
- Overexposed windows
- Yellow or blue colour casts
- Harsh flash shadows
- Lamps creating bright hot spots
- Inconsistent colour between rooms
- Bathrooms with poor mirror reflections
- Dark corners hiding usable space
- Exteriors shot at an unflattering time of day
- Edited photos that look unrealistic
- Views that disappear through bright windows
These issues can weaken the listing’s online presentation.
A strong photo gallery should feel consistent. The lighting should support the property, not distract from it.
How Lighting Supports the Agent’s Brand
Every listing reflects the agent’s marketing standard.
When Vancouver realtors consistently use clean, well-lit, professionally edited listing photos, the quality becomes part of their brand. Sellers notice. Buyers notice. Brokerages notice.
Strong lighting communicates preparation and care. It shows that the listing was not treated as a quick upload. It also gives agents better assets for MLS, social media, websites, brochures, email campaigns, and listing presentations.
This matters because real estate marketing is cumulative. Each listing becomes public proof of how the agent presents property.
Lighting is not just a technical photography issue. It is part of brand perception.
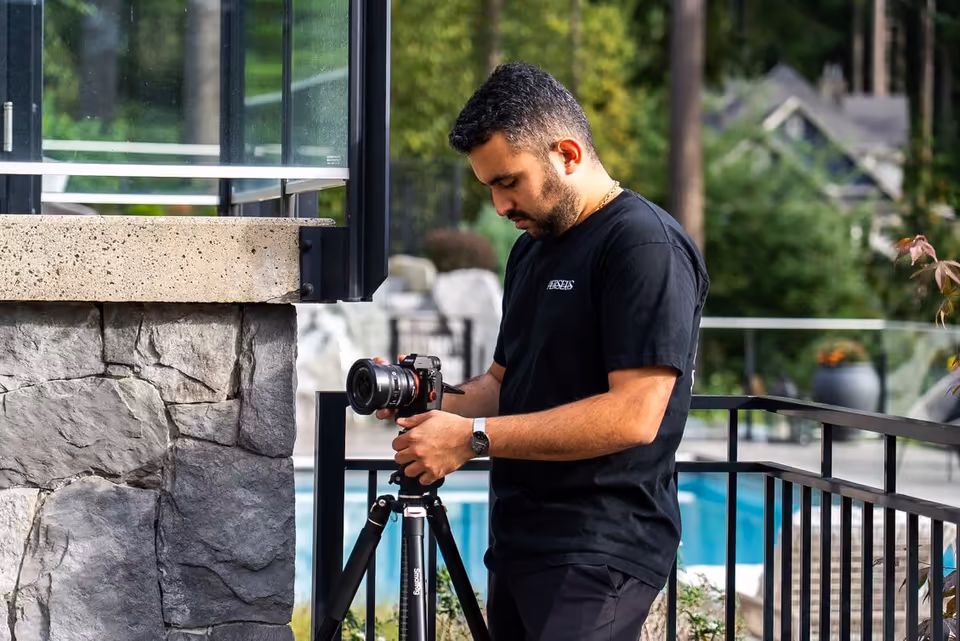
How Perseus Creative Studio Approaches Real Estate Photography Lighting
Perseus Creative Studio helps Vancouver real estate agents and brokerages create professional listing media built for modern property marketing.
Our photography approach focuses on clarity, lighting, composition, and final usability. The objective is not only to make a property look attractive. The objective is to make the listing easier to understand across MLS, websites, social media, email campaigns, and future seller presentations.
For real estate photography, lighting decisions are made around the property’s actual strengths. A bright condo with a view, a shaded townhome, a luxury home with dramatic interiors, and a family property with outdoor space should not all be photographed the same way.
Each listing needs a lighting approach that supports the property’s layout, mood, features, and buyer expectations.
Explore our real estate photography and listing media services, or contact Perseus Creative Studio to plan photography for your next Vancouver listing.
Key Takeaway
Lighting has a direct impact on the quality of real estate photography. It affects how buyers perceive space, condition, brightness, finishes, views, and overall listing professionalism.
Good lighting makes a property easier to understand. Poor lighting creates friction.
For Vancouver realtors, lighting should be treated as part of the listing strategy, not just a photography detail. When the light is planned well, the final images feel cleaner, more accurate, and more useful across every marketing channel.