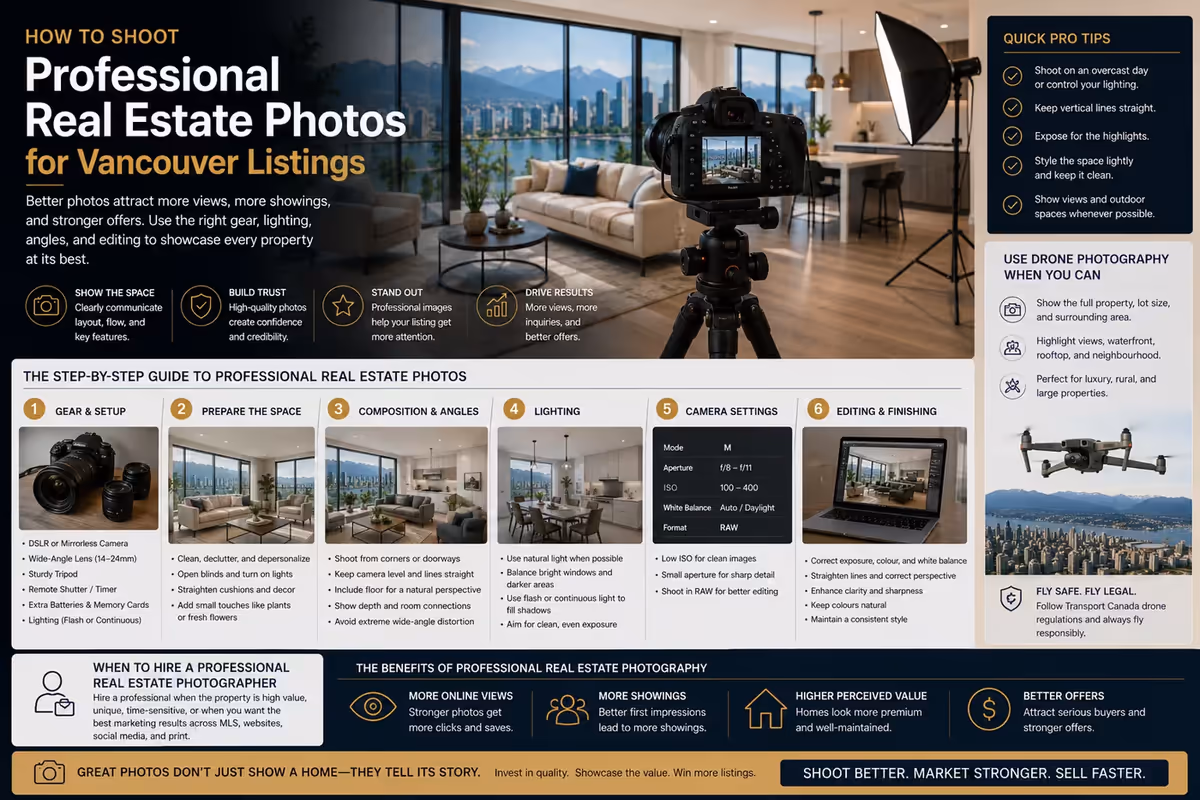
Why Professional Real Estate Photos Are Built, Not Snapped
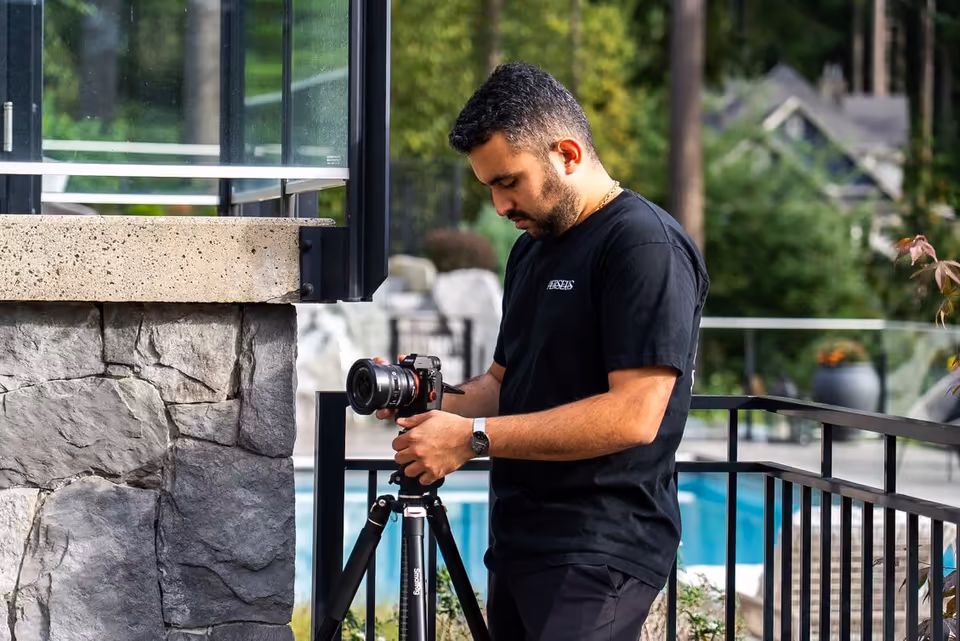
Professional real estate photography is not only about owning a good camera. It is a process.
The final image depends on preparation, gear, lighting, camera height, composition, timing, editing, file delivery, and how the photos will be used across the listing campaign. A room can look clean in person but photograph poorly if the light is wrong, the angle is weak, the vertical lines are crooked, or the editing is inconsistent.
For Vancouver realtors, this matters because buyers often see the listing online before they decide whether to book a showing. A photo gallery has to communicate quickly. It should show the property clearly, accurately, and professionally across MLS, Realtor.ca, agent websites, social media, email campaigns, open house promotion, and seller presentations.
This guide explains how to take professional real estate photos, what gear and techniques matter, how to think about lighting and angles, where editing fits, and when a realtor should bring in a professional media team instead of trying to handle the shoot alone.
Professional photography does not guarantee more showings, faster sales, or stronger offers. Pricing, location, condition, timing, market demand, and seller strategy still matter. But strong photos can improve the quality of the listing’s presentation, which is one of the first things buyers judge online.
Quick Answer
To take professional real estate photos, prepare the property first, use a camera with manual controls, shoot with a wide-angle lens on a tripod, keep vertical lines straight, balance natural and artificial light, compose each room to show layout clearly, and edit for clean exposure, colour, perspective, and consistency. For Vancouver listings, the goal is not to make rooms look unrealistic; it is to make the property easy to understand online.
Key Takeaways
- Professional real estate photography starts with preparation, not camera settings.
- A tripod, wide-angle lens, and manual controls are core tools for consistent listing photos.
- Lighting should make the space clear and believable, not artificially bright.
- Strong angles explain room flow, function, and scale.
- Editing should improve clarity while preserving trust.
- Drone photography can help when location, lot size, views, or exterior context matter.
- Realtors should hire a professional when the listing needs consistent public-facing media.
Start With a Prepared Property
Before gear or lighting, the property has to be ready.
A professional camera will not fix clutter, personal items, dirty windows, messy bedding, uneven furniture, or poor staging. Those issues become more visible in photos, especially in kitchens, bathrooms, bedrooms, living areas, and outdoor spaces.
Before the shoot, prepare:
- Kitchen counters
- Bathroom counters
- Beds and bedding
- Living room furniture
- Entry areas
- Desks and office spaces
- Balconies and patios
- Windows and mirrors
- Floors
- Exterior entry and curb appeal
- Outdoor furniture and landscaping
Remove items that distract from the property, such as laundry, personal documents, visible cords, excessive shoes, pet items, cleaning supplies, garbage bins, and cluttered small objects.
The goal is not to make the home feel artificial. The goal is to let buyers focus on the space.
For Vancouver condos and townhomes, preparation is especially important because smaller spaces can look crowded quickly. A clean counter, straightened chair, or cleared hallway can make the final image easier to read.
Choose Gear That Supports Accuracy
Gear matters, but it should support the listing strategy. The best real estate photography equipment is reliable, controlled, and consistent.
At a practical level, the core setup includes:
- Camera with manual controls
- Wide-angle lens
- Tripod
- Remote shutter or timer
- Spare batteries
- Memory cards
- Lighting tools
- Editing software
- File delivery workflow
A camera with manual controls allows the photographer to manage exposure, aperture, shutter speed, ISO, and white balance. This is important because real estate interiors often include bright windows, darker corners, reflective surfaces, and mixed lighting.
A wide-angle lens helps capture more of a room, but it should be used carefully. Excessive wide-angle distortion can make a room feel misleading. Buyers may distrust photos if the space looks dramatically different in person.
A tripod is essential for consistency. It helps keep images level, supports slower shutter speeds, and makes exposure bracketing more reliable.
Adobe’s real estate photography guide also emphasizes consistency across images, including keeping the same aspect ratio from one picture to the next when producing exterior real estate photos. That principle matters because listing galleries should feel unified, not random.
Recommended Tools for Real Estate Photography
| Tool | Why It Matters | Practical Note |
|---|---|---|
| Camera with manual controls | Gives control over exposure and colour | Useful for difficult interiors and bright windows |
| Wide-angle lens | Captures more of the room | Avoid extreme distortion |
| Tripod | Keeps images sharp and level | Essential for slow shutter speeds and bracketing |
| Remote shutter or timer | Reduces camera shake | Helpful for low-light interiors |
| Flash or lighting kit | Balances dark rooms and bright areas | Should look natural, not harsh |
| LED panel | Adds selective fill light | Useful in small dark areas |
| Grey card or white balance tool | Improves colour consistency | Helpful with mixed lighting |
| Lightroom or similar software | Handles exposure, colour, and export | Good for consistent batch editing |
| Photoshop or advanced editor | Useful for detailed corrections | Should not be used to misrepresent the property |
| Drone | Adds exterior and location context | Must follow applicable drone rules |
The tool list should not distract from the core objective. Buyers do not care what camera was used. They care whether the images help them understand the property.
Use Camera Settings With a Clear Purpose
There is no single perfect camera setting for every listing. Real estate photography changes based on light, room size, lens, tripod use, window exposure, and editing method.
Still, the settings should support a few goals:
- Keep the image sharp.
- Preserve room detail.
- Avoid unnecessary noise.
- Keep perspective controlled.
- Maintain consistent colour.
- Capture enough exposure range for editing.
In many real estate interiors, photographers use a tripod and lower ISO to preserve image quality. Aperture is usually chosen to keep the room sharp. Shutter speed can be slower because the camera is stabilized. Exposure bracketing may be used when windows are much brighter than the interior.
The technical choices should serve the final image. A technically sharp photo is not enough if the angle is confusing or the lighting feels unnatural.
For agents, the takeaway is simple: professional results require control. Automatic camera settings may work for casual photos, but real estate interiors often need more deliberate handling.
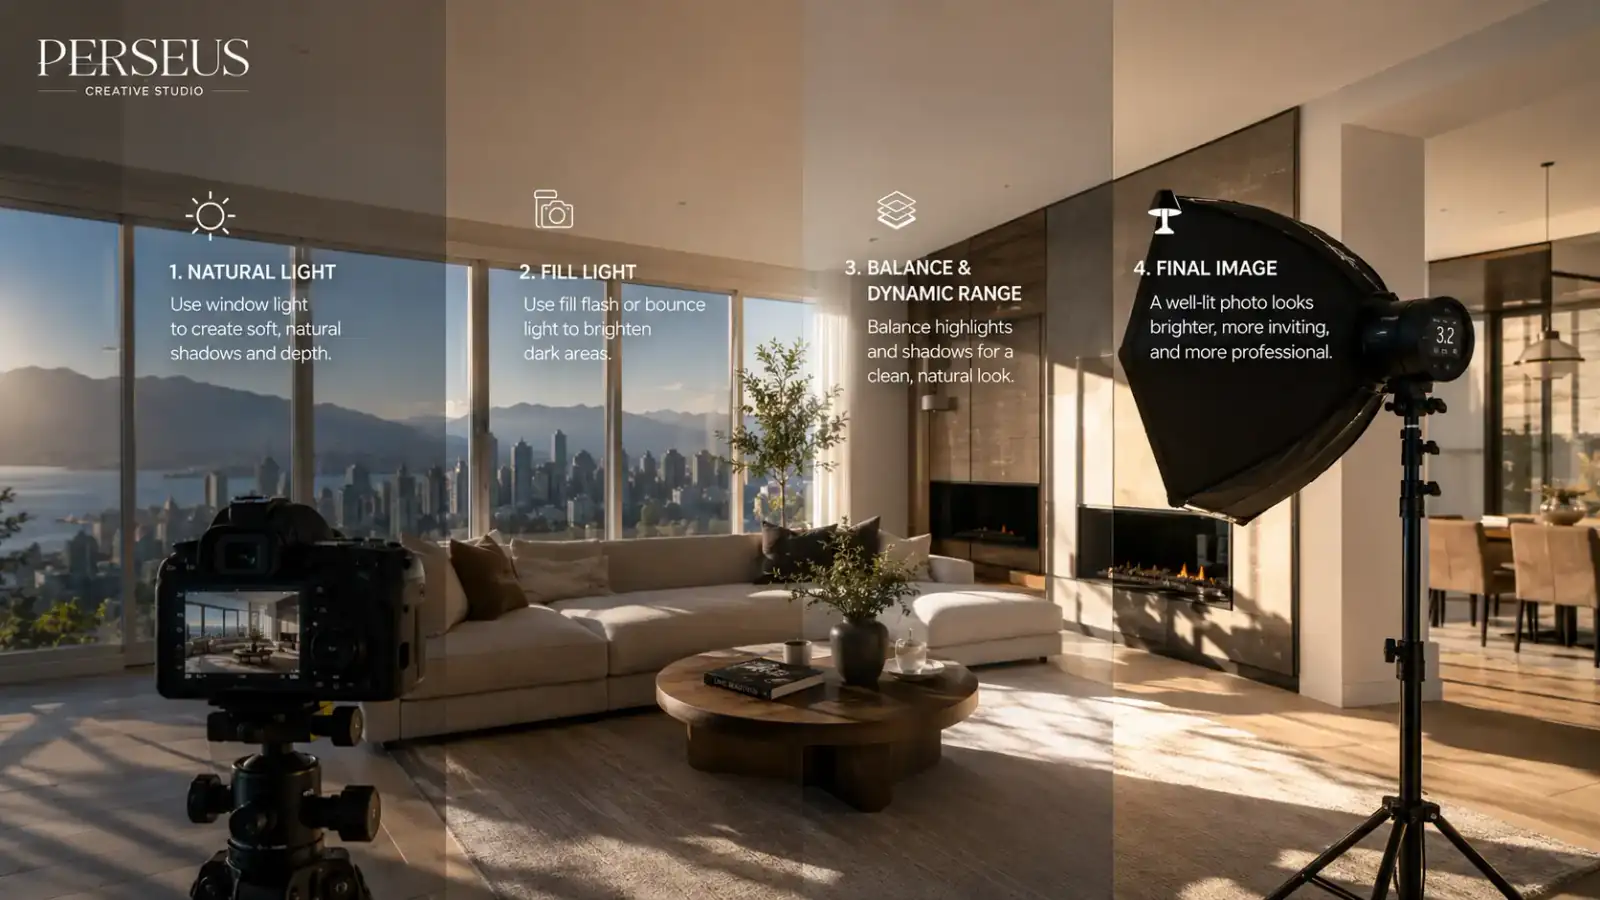
Master the Lighting Before You Touch Editing
Lighting is where many real estate photos succeed or fail.
A room can have strong design, good staging, and quality finishes, but poor lighting can make it feel dull, dark, or inconsistent. Lighting affects how buyers perceive room size, cleanliness, condition, and overall appeal.
Real estate photographers usually work with several lighting sources:
- Natural light from windows
- Interior lights
- Flash
- LED fill
- Reflected or bounced light
- Exposure blending in editing
The best approach depends on the property.
Natural light helps rooms feel believable. Flash can help balance dark areas. Exposure bracketing can preserve window views. Interior lights can add warmth, but they may also create yellow colour casts or hot spots.
For Vancouver properties, lighting planning matters because weather, season, window direction, and surrounding buildings can change the look of a room. A north-facing condo, shaded townhouse, view property, and luxury home with dramatic interiors all require different lighting decisions.
For a deeper guide, see our article on real estate photography lighting for Vancouver listings.
Balance Windows Without Losing the View
Windows are one of the hardest parts of real estate photography.
A camera sees a wider contrast problem than the human eye. The room may look balanced in person, but in a photo the window can become too bright or the interior can become too dark.
This is especially important for Vancouver properties with mountain, ocean, skyline, park, or city views.
The solution may include:
- Shooting at the right time of day
- Adjusting blinds or curtains
- Using exposure bracketing
- Using flash carefully
- Blending exposures in editing
- Choosing an angle that shows the room and view together
The goal is not to create a fake view. The goal is to represent the room and exterior context in a believable way.
A blown-out window can waste one of the property’s strongest features. An overly dark room can make the home feel less inviting. A balanced approach helps buyers understand both.
Avoid Mixed Colour Problems
Mixed lighting is common in real estate interiors.
A room may have daylight from windows, warm ceiling lights, cooler LED bulbs, under-cabinet lighting, lamps, and reflected light from walls or floors. If not controlled, the final photo can look yellow in one area and blue in another.
This can make the property feel inconsistent.
To reduce mixed lighting issues:
- Use consistent bulbs where possible.
- Turn off lights that create strong colour casts.
- Use natural light as the main source when it works.
- Use flash or fill to balance colour.
- Set white balance carefully.
- Correct colour consistently in editing.
Colour consistency matters because buyers use photos to judge finishes. Cabinets, flooring, walls, countertops, and tile should look believable.
A gallery with inconsistent colour can make the listing feel less professional.
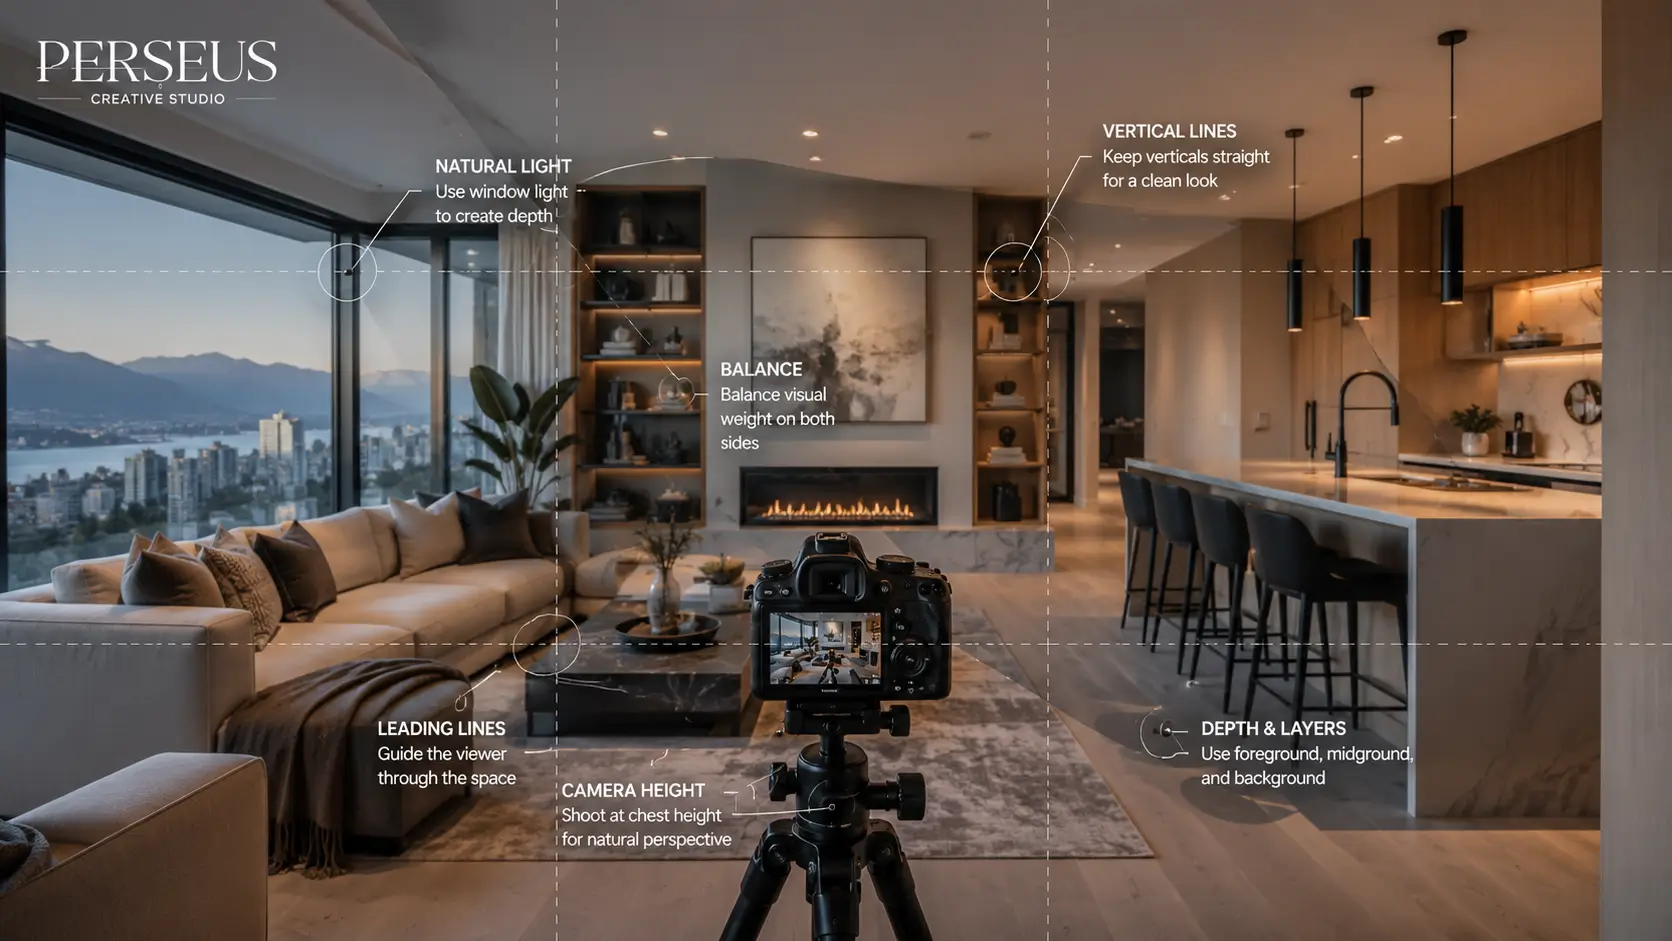
Choose Angles That Explain the Room
Real estate angles should be selected for clarity.
The best angle is not always the widest angle. It is the angle that helps buyers understand the room’s function, scale, and connections.
Good angles show:
- Room purpose
- Windows and light
- Furniture placement
- Connection to nearby spaces
- Main features
- Floor area
- Sightlines
- Outdoor access where relevant
Corners and doorways often work well because they show more depth. But standing in the farthest corner is not always the right choice. In small spaces, overly wide framing can distort the room. In large rooms, the wrong corner can make the image feel empty or confusing.
For Vancouver condos and townhomes, this matters because buyers care about efficient use of space. The photos should show how the room works, not only how much can be squeezed into the frame.
For a deeper breakdown, see our guide on real estate photo composition tips for Vancouver listings.
Keep Vertical Lines Straight
Crooked vertical lines can make real estate photos feel amateur.
Door frames, window frames, walls, cabinets, and built-ins should usually appear straight. When verticals lean, the room can feel unstable or distorted.
This can happen when the camera is tilted up or down too much, when the tripod is not level, or when a wide lens is used carelessly.
To keep verticals clean:
- Use a tripod.
- Level the camera.
- Use grid lines or a camera level.
- Avoid extreme upward or downward tilt.
- Correct perspective carefully in editing.
Straight vertical lines are especially important in modern Vancouver homes, luxury properties, high-rise condos, and listings with strong architectural features.
A buyer may not consciously notice straight lines. But they will often feel the difference between a polished image and a rushed one.
Set Camera Height Intentionally
Camera height shapes how the room feels.
If the camera is too high, furniture can look compressed and surfaces can dominate the frame. If the camera is too low, counters, beds, and tables can feel oversized. The right height depends on the room.
In many interiors, a mid-level camera height works well because it feels natural and keeps the room proportions comfortable. Kitchens, bathrooms, bedrooms, and living rooms may each require different adjustments.
The camera height should support the main purpose of the image.
A kitchen photo may need to show counters and cabinetry. A living room photo may need to show seating, windows, and flow. A bedroom photo may need to show bed placement and usable space. A bathroom photo may need to manage mirrors and tight framing.
Professional photography is full of these small decisions. Together, they make the gallery feel more credible.
Build a Shot List Before the Shoot
A shot list protects the listing campaign from missing important images.
The exact shot list depends on the property, but most listings need coverage of:
- Exterior front
- Exterior rear or outdoor areas
- Entry
- Living room
- Kitchen
- Dining area
- Primary bedroom
- Secondary bedrooms
- Bathrooms
- Office or den
- Laundry
- Basement or suite
- Storage or garage where relevant
- Balcony, patio, deck, or yard
- Views
- Detail shots where useful
- Building amenities where relevant
- Neighbourhood context where appropriate
A shot list should not become rigid. The photographer still needs judgment. But a list ensures the listing has enough visual coverage to support MLS, websites, social posts, open house materials, and seller presentations.
Capture Detail Shots With Restraint
Detail shots can help a listing feel more premium, but they should not replace clear room images.
Useful detail shots may include:
- Stone counters
- Tile work
- Custom cabinetry
- Hardware
- Lighting fixtures
- Appliances
- Built-ins
- Fireplace materials
- Flooring
- Architectural character
- Outdoor finishes
Detail shots should support the listing story.
A luxury property may need more detail coverage. A standard condo may only need a few supporting close-ups. A renovated kitchen may benefit from material details. A character home may benefit from original architectural features.
Avoid adding detail shots only to fill the gallery. Every image should help the buyer understand the property.
Editing Real Estate Photos Like a Professional
Editing should make the photos cleaner, clearer, and more consistent.
Common editing steps include:
- Exposure correction
- White balance correction
- Highlight and shadow recovery
- Perspective correction
- Lens distortion correction
- Colour consistency
- Cropping
- Sharpening
- Noise reduction
- Window exposure balancing
- Exporting for web, MLS, and social use
Editing should not misrepresent the property.
Removing temporary clutter may be acceptable in some workflows if it does not mislead buyers, but changing permanent features, hiding material issues, or dramatically altering views can create trust problems.
A professional editing style should feel polished and believable.
Buyers should not feel surprised in a negative way when they see the property in person.
Clutter Removal and Polishing
The best clutter removal happens before the shoot. Editing should not become the main cleaning strategy.
Still, some polishing may happen in post-production. This could include small corrections such as removing minor distractions, improving colour balance, cleaning up perspective, or correcting exposure.
Be careful with anything that changes the property itself.
Safe editing usually improves presentation. Risky editing changes expectations.
Examples of safer edits may include:
- Correcting vertical lines
- Balancing exposure
- Improving white balance
- Reducing minor glare
- Cropping distractions
- Cleaning small temporary marks when appropriate
Examples to avoid include:
- Removing permanent fixtures
- Changing views
- Making rooms look larger than they are
- Hiding damage or material defects
- Replacing major exterior context
- Altering finishes unrealistically
The goal is clarity, not deception.
Export Images for the Places They Will Be Used
A professional workflow does not end when editing is done.
Images need to be exported correctly for their use case. MLS galleries, agent websites, social media, email campaigns, print materials, and paid ads may all need different dimensions or file sizes.
A good delivery package may include:
- MLS-ready images
- Web-optimized images
- High-resolution files
- Social media crops where needed
- Hero image options
- Branded and unbranded versions where appropriate
- Organized folders
- Clear file naming
Google’s Image SEO best practices also emphasize that images should be supported by relevant page context, useful alt text, descriptive information, and proper discoverability signals when used on websites.
For real estate websites, that means the image workflow should connect to the page workflow. Strong images work best when they are placed on fast, well-structured pages with clear context.
Bonus: When to Use Drone Photography
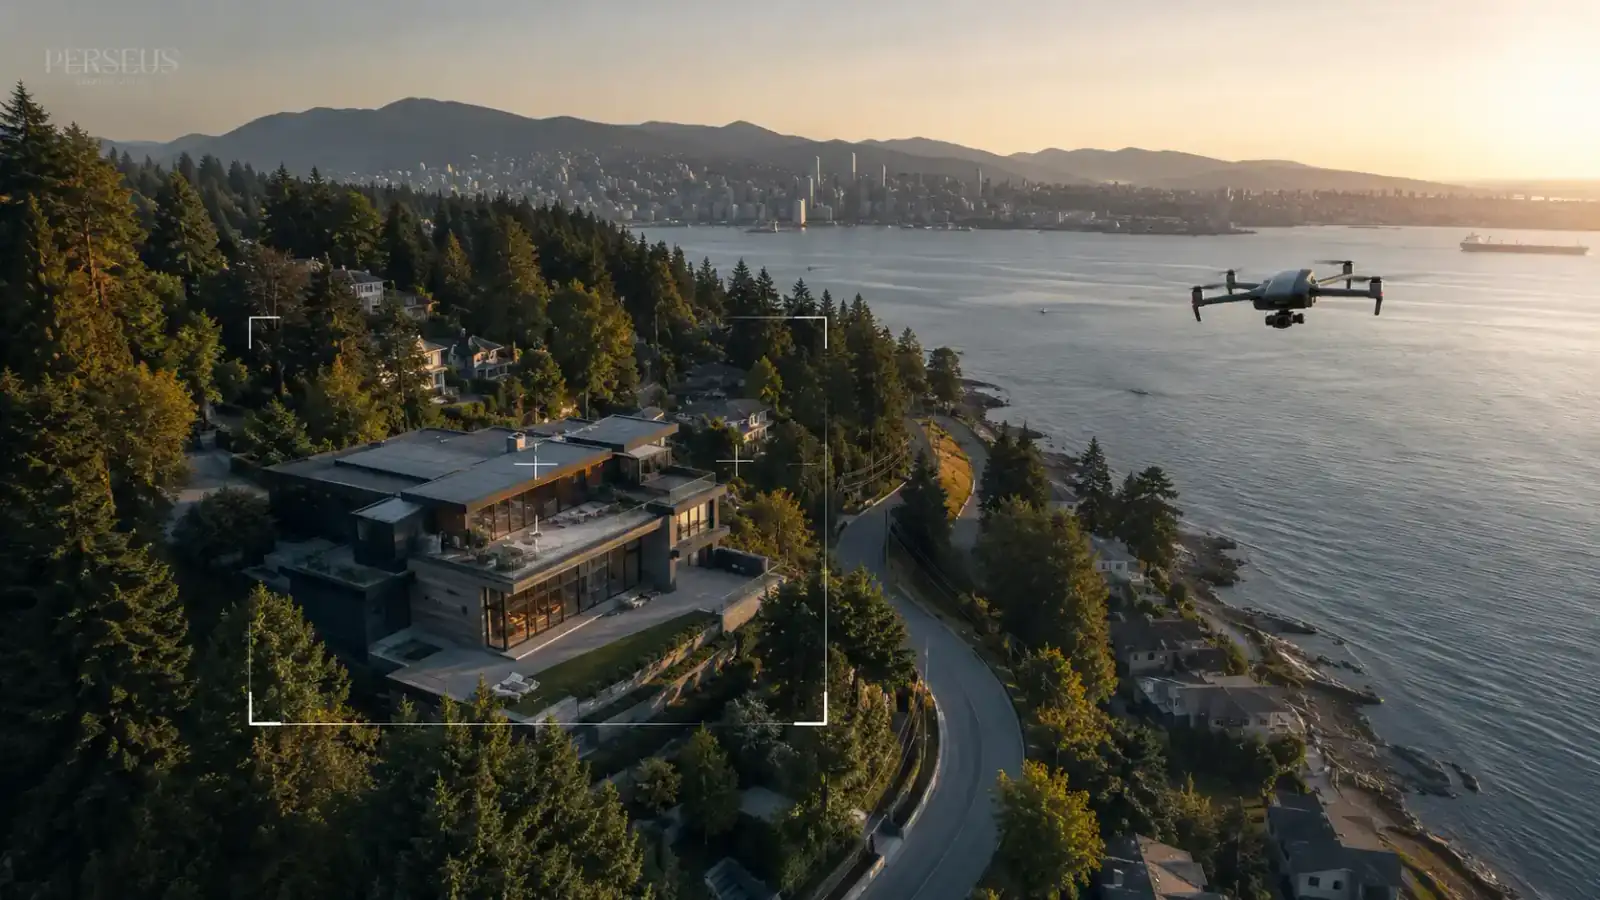
Drone photography can be useful when the property’s value depends on context.
It may be worth using when the listing has:
- Strong views
- Larger lot size
- Waterfront or park proximity
- Interesting architecture
- Outdoor living areas
- Privacy
- Development potential
- Neighbourhood context
- Luxury positioning
- Rural or semi-rural setting
Drone photos can show what ground-level photos cannot: lot shape, exterior layout, view direction, nearby amenities, skyline, mountains, water, and property context.
However, drone photography is not necessary for every listing. If the property’s strongest features are interior layout and finishes, the budget may be better spent on photography, floor plans, or video.
For a deeper guide, see our article on drone photography for Vancouver real estate listings.
What to Capture With a Drone
Drone photography should be planned, not random.
Useful aerial shots may include:
- Front elevation from above
- Rear exterior and yard
- Lot shape
- View direction
- Outdoor living areas
- Roofline and architecture
- Nearby parks or trails
- Waterfront, skyline, or mountain context
- Street position
- Privacy and surrounding spacing
Skip drone shots that do not help buyers understand the listing.
A dramatic aerial image that says nothing about the property is not useful. The best drone images answer a practical question: where is the property, what surrounds it, and why does that matter?
Drone operation should also be handled responsibly. In Canada, Transport Canada provides drone safety guidance covering requirements such as registration, pilot certification, and operational rules. Realtors should work with qualified operators when aerial production is part of a listing campaign.
Photography and Video Should Work Together
Photography is usually the foundation of the listing campaign, but video can extend the story.
Photography helps buyers scan and compare. Video helps buyers understand flow, movement, and atmosphere. Aerial video can add location context. Short-form vertical clips can help the listing travel across social platforms.
For many Vancouver listings, the strongest approach is not photography or video. It is using both when the property needs both.
A simple listing may only need professional photos and a floor plan. A view property, luxury home, waterfront listing, or multi-level townhome may benefit from photography, video, aerial production, Matterport, and social cutdowns.
When Realtors Should Hire a Professional Instead of Shooting Themselves
Realtors can take basic photos for documentation, quick updates, or internal communication. But public listing photography is different.
A professional should usually be hired when:
- The listing is going on MLS.
- The seller expects strong marketing.
- The property has difficult lighting.
- The home has views.
- The layout is complex.
- The property is luxury or premium.
- The agent needs social-ready assets.
- The campaign needs consistent branding.
- The listing needs video, aerials, or Matterport.
- The agent wants reliable turnaround and delivery.
DIY photos may save money upfront, but weak listing visuals can affect the entire campaign. Poor photos can make the property harder to understand and make the agent’s marketing standard look weaker.
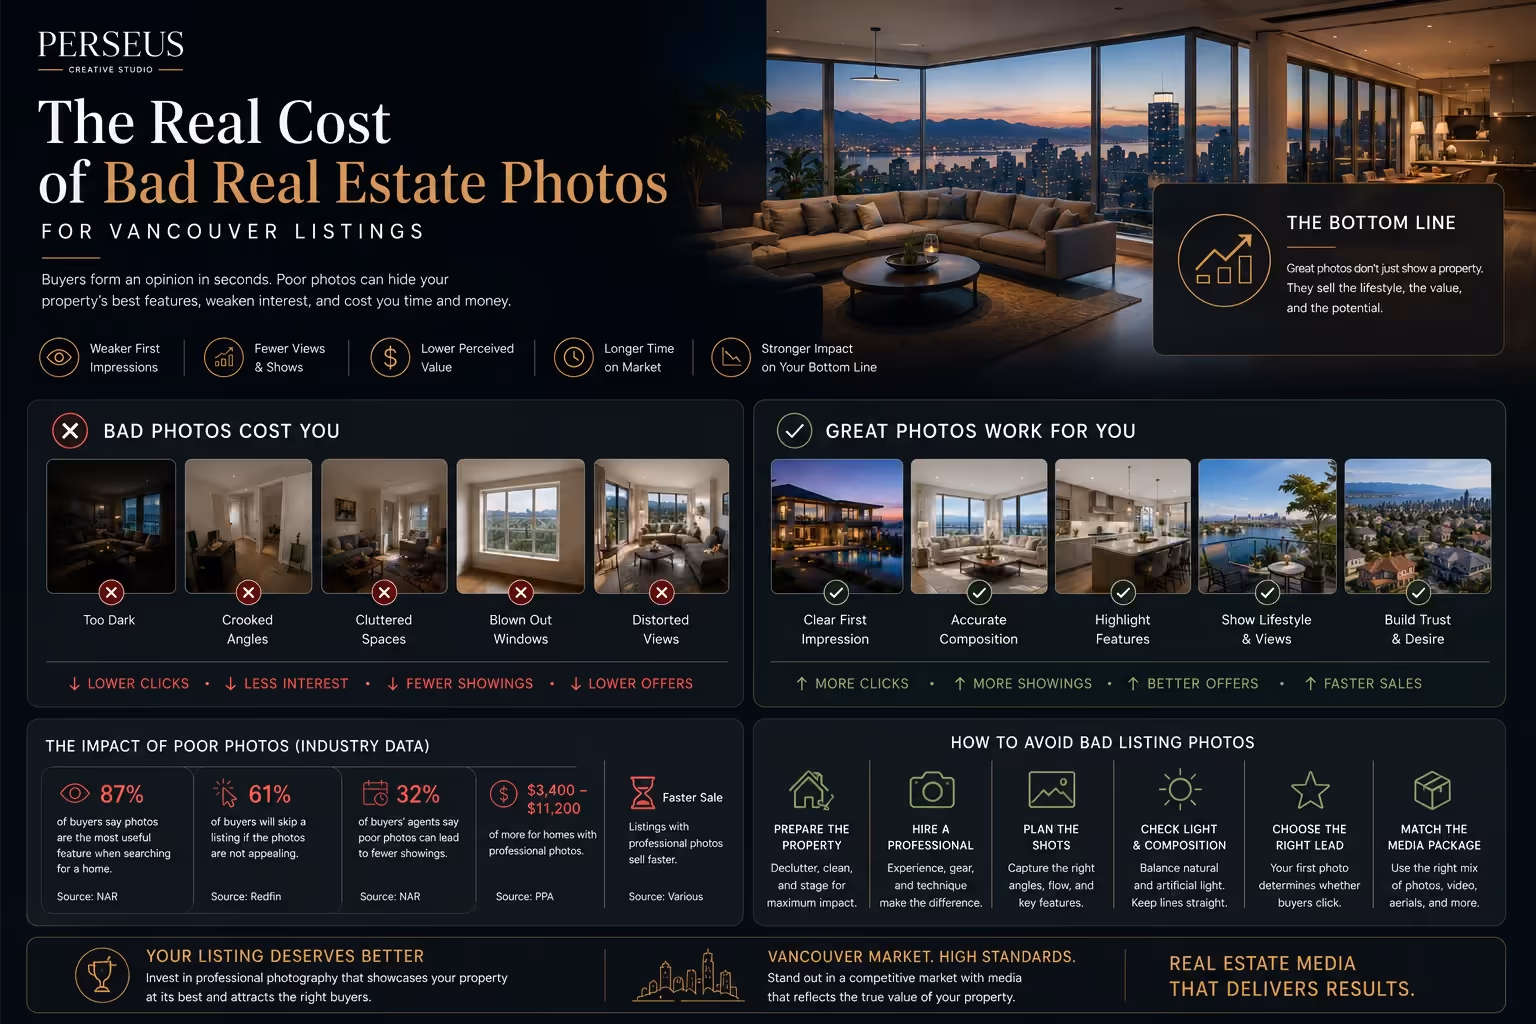
For more on this risk, read our guide on the cost of bad real estate photos for Vancouver listings.
Common Real Estate Photography Mistakes
Many real estate photography mistakes are avoidable.
Common issues include:
- Shooting before the property is prepared
- Using automatic settings in difficult lighting
- Forgetting to level the camera
- Using too wide of a lens
- Creating heavy distortion
- Overexposing windows
- Leaving dark corners
- Ignoring mixed colour temperatures
- Choosing weak angles
- Not showing outdoor spaces
- Overediting the gallery
- Delivering inconsistent file sizes
- Forgetting social media needs
- Skipping a shot list
- Treating photography as a last-minute task
A professional workflow reduces these mistakes because it treats listing media as a production process.
How Perseus Creative Studio Helps Vancouver Realtors With Professional Listing Photos
Perseus Creative Studio helps Vancouver real estate agents, brokerages, developers, and property-focused businesses create professional listing media for modern property marketing.
Our real estate photography process considers preparation, lighting, composition, editing, delivery, and how the final assets will be used across the campaign. For some listings, that means clean photography and a 2D floor plan. For others, it means photography, videography, aerial production, 3D models, Matterport, and short-form social content.
The right approach depends on the property.
A Vancouver condo, North Vancouver townhome, West Vancouver luxury property, Burnaby family home, and waterfront listing should not all be photographed the same way.
Explore our real estate photography and listing media services, view our real estate media projects, or contact Perseus Creative Studio to plan professional listing photos for your next Vancouver property.
Key Takeaway
Professional real estate photography is built through preparation, controlled gear, intentional lighting, clear composition, careful editing, and practical delivery.
For Vancouver realtors, the goal is not just attractive photos. The goal is to make the property easier to understand online, easier to promote across digital channels, and more credible to buyers and sellers.
A strong photo gallery can support the entire listing campaign. A weak one can make every next step harder.